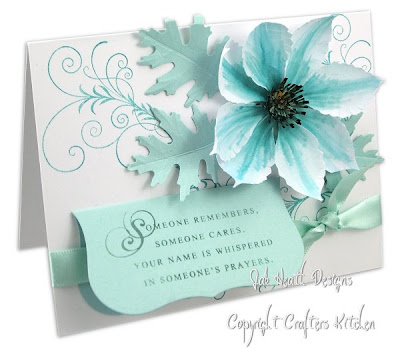
I used the Silent Night Flourish By Papertrey Ink to stamp a background onto the white base card, I made up the Flower (instruction's are below) and added in to the top corner of the card,
Using the Nestabilities Label Die I cut out the 2nd largest shape and folded it in half and stamped the Everyday Blessing sentiment on the front

I attached the label onto the card and tied a ribbon around the bottom of the card and knotting it.
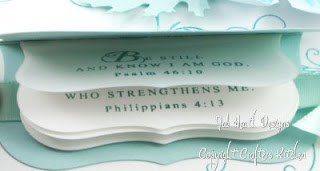
This is the inside of the Nestabilities folded Label, I cut paper with the next size down Label die and stamped sentiment from Everyday Blessings inside

Making the Flower
Cut out all of the pieces from the template (template at the bottom of post).
1. First to make the stamen colour on both sides as shown in the template and snip with scissors to fringe the edge starting at the thin yellow end add a small amount of glue to the edge that wasn't fringed then tightly roll from the thin end finishing a the thick end of the shape the glue will hold this in place. once the glue is dray open(splay) the fringing so it looks like the stamen in the picture below.
2.Cut out 8 of the large petal shapes then using water colours paint the colour shading onto the shapes starting at the blunt end getting light to the pointed end you can see this shading in the picture below.
Once dry cup them by rolling an embossing tool inside the petal shapes. Then pinch the the blunt end of the petal this is the end you will glue onto the daisy shape petals.
3. Take the daisy and push into the center with an embossing tool then add a little glue to each of the daisy petals and attach the main coloured flower petals leaving a little gap in the centre now add the stamen by adding glue into the centre of the flower.
4. Cut some leaf shapes and score with a pointed tool (darning needle) the leaf veins and attach these to the bottom of the flower


7 comments:
Hi Jak I just love the flower shown in this tutorial and would really like to give it a go... which papper do you find works best when making this?
Many Thanks
Ros
Hi Jak, can't clmatis understand istructions - 'pinch the blunt end of petal ...glue to daisy shaped petals' where is the daisy, pleez??? is it the 'stamen' star shape in the download??
Yes Rosie the daisy shape looks like a star type shape ams it is on the download there is 2 ends to the petal shape, 1 has a definate point and the other is blunt
and yes the daisy shape is the stamen on the download.
This flower is stunning the hole card is stunning
gorgeous flower. I have seen a few flower tutorials online and have never been able to achieve the look. I think I will be able to follow your directions for this one.
this makes a beautiful flower. If I get it right I will show you.
thanks for template
wow... the flower is just beautiful. i love your work. :)
Post a Comment